Hi Everyone!! 
Today I am a Guest Designer for Gerda Steiner Designs.
I am sharing a card using the All Cats stamp set.
The cats in this stamp set are just too fun!! 
I loved coloring them with copic markers.
The cat I used in today's card reminded me of the beloved grumpy cat!


I colored this cat with the gray (N1-N5 family) copic markers, then fussy cut it out. Next, I used some patterned paper from Doodlebug design for the background layer. Then I used a grass border die to die cut some green grass for the cat to sit on. I added this to white card stock that is embossed with a cloud embossing folder then die cut with a 3x4 journal die. The cute birds are paper pieced with matching patterned papers and sitting on a twine rope, I added some knots to the corners. Finally, I added the fun "Stay Pawsitive" sentiment from the stamp set, in black ink, to a die cut banner then added some twine around the edge ending in a bow. For a finishing touch, I added some glossy accents to the eyes and beaks and a few white gel pen accents.

Thank you so much for stopping by! 

Have a wonderful day!

Kimberly

**Disclaimer: This post contains affiliate links.**

Supplies-
Paper-  Gray card stock (Recollections), Smitten Kitten 6x6 paper (Doodlebug Design), Green dots and Teal dots patterned paper (TPS)
Ink- Tuxedo Black ink (Memento), Onyx Black ink (Versafine), Copic markers, Clear embossing powder, white gel pen
Other- Stitched Journaling Die (Lawn Fawn), Grassy Border die (Lawn Fawn), Totally White Trendy Twine, Cloudy Sky embossing folder (Darice), Glossy Accents (Ranger), Sparkle pen (Spectrum Noir)
Hi Everyone! 
Today I am sharing a few cards. 
The first card I used the current 


I followed the sketch and made a card for my husband, he adores pizza and pepperoni. I used the Pizza My Heart stamp set from Lawn Fawn. I stamped and copic colored the pizzas. I added four pizzas to the right side for the scallop edge on the sketch. Then two heart pizzas with the cute stamped faces and of course, the mustache face for my hubby! The sentiment is heat embossed on black card stock in white. I finished the card with a few hearts die cut with the stitched journaling die from Lawn Fawn.


This card is inspired by the crafty Heidi Criswell and her card she posted {here}.
I made this one for our son, I thought he would just love it! I stamped the pizzas and cutters in a random pattern and then colored them with copics. Then I added some green and red hearts to fill the space. Next, I stamped and heat embossed the sentiment in white. I added an extra cutter that was fussy cut next to the sentiment.


For the second card, I used the pizza slices from the set
 and kept it simple and fun. 
This card is for our daughter. I stamped and copic colored the slices and the cutter, then fussy cut them out. I popped one slice of the pizza up with the cute girly face towards the bottom. I stamped the sentiment in black and then some hearts from the set in red. I finished the card with some patterned paper and black card stock.

Thank you so much for stopping by!
Have a wonderful day!

Kimberly


Supplies:
Stamps- Pizza My Heart (Lawn Fawn)
Ink- Tuxedo Black (Memento), Lady Bug (Memento),Regal Rose, Green Galore, Summer Sun (SU), Onyx Black (Versafine), Versamark, White embossing powder, Copic markers
Paper- With Love and XOXO 6x6 paper pads (American Crafts), Black card stock (TPS), White card stock (Core'dinations and Georgia Pacific)
Dies- Stitched Journaling Die (Lawn Fawn)
Other- Clear Sparkle glitter pen (Spectrum Noir), White gel pen, 


Hi Everyone!! 
Today I am sharing a card for the current


I made a Valentine's card for our daughter, most of the supplies are from the February 2016 Simon Says Stamp card kit. I just love this pretty Ombre paper and those stickers. I used Gold embossing powder for the sentiment, Gold Glitter paper for the hearts and for the strip on the side of the card. Next to that I added a strip of black card stock and added some of the stickers from the Hello Love stickers by Crate Paper. Then finished it with some white and gold twine.

Thanks so much for stopping by! 
Have a wonderful day!

Kimberly

Supplies:
Stamp- Hello Beautiful stamp set (Simon Says Stamps)
Paper- Hello Love 6x6 and Stickers(Crate Paper), Gold Glitzy Glitter paper (DCWV), 
Black Card stock(TPS)
Ink- Versamark, Gold Embossing powder
Other- Heart dies (Simon Says Stamp), Twine (Target $1 spot)
Hi Everyone! 
Today I am sharing a card featuring 
For my card today, I made a stenciled background with stars and layered the Hello Die for a bold sentiment.


Then I added some pretty rhinestones to accent the stars.
The Hello is die cut from white glitter paper to add some more shimmer.


Thank you so much for stopping by!
Don't forget to join the current 
Have a wonderful day!

Kimberly

Ink- Dusty Concord (Distress ink)
Paper- Purple and Teal card stock (Recollections), White glitter card stock 
Other- Stencil (Heidi Swapp), Rhinestones (recollections)
Hi Everyone!!
Happy Monday!! 
I hope your week is off to a great start.
This weekend I was able to get some cards 
done for the lastest 

I couldn't wait to participate in this challenge, I am always trying to use my neglected crafty products. Are you with me? :) I always want it all, but sometimes I don't get to use it.
So this challenge is the perfect opportunity.

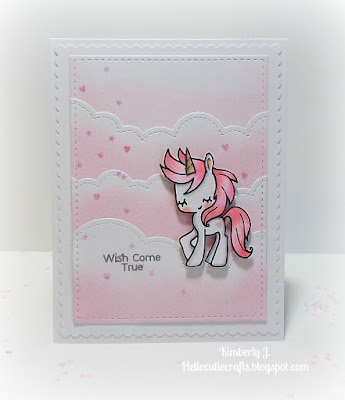
I started out by stamping and coloring the unicorn and ponies from the Magical Friends stamp set (The Greeting Farm) with copic markers. I stamped extra 'horns' from the one unicorn and turned the ponies into unicorns. I made three cards, one with each unicorn and color theme.


For the first card, I did a lavender theme and used Milled Lavender distress ink. I die cut several layers with all three of the Puffy Cloud border die(Lawn Fawn) and inked the bottom half of each one them layered them. Next, I die cut the panel with the stitched rectangle die from the Basic Set Die (Mama Elephant). I added the scalloped rectangle die cut in white behind it. This is all layered onto a white A2 card base. Then popped up the unicorn on the card front and added a heat embossed sentiment in silver from the same stamp set. 

This card has a pink theme 
and I used Spun Sugar distress ink.


This one has a teal theme 
and I used Peacock Feathers distress ink.


I finished each card off with some shimmer with a Spectrum Noir Sparkle pen in clear and some heart and star sequins (StudioKatia).

Neglected products used:
Puffy Cloud Border dies- Lawn Fawn 
(only used once)
Spectrum Noir Sparkle pen-Clear

Thanks so much for stopping by!
I hope you can join these fun challenges and use some of your stash!
Have a wonderful day!

Kimberly


Hi Everyone! 
Today is my day to share a project 
For my card today I am using the cute bear from Sunflowers stamp set, coordinating Sunflowers dies and the So Sorry stamp set.
I made a Belated Birthday card using these sets. I always like the look of colored images on kraft cardstock.

I stamped the cute bear and sentiment in brown ink, the colored the bear with prismacolor pencils. I also stamped, colored and die cut the bow from the stamp set.
Next, I added some white gel pen accents to the bear and outlined the "Sorry" part of the sentiment to help it stand out. The card is pretty much one layered so it will be easy to mail.


Thank you so much for stopping by!
Don't forget to join the current 
Have a wonderful day!

Kimberly

Paper- Crumb cake card stock (SU)
Ink- Hybrid Chocolate Brown ink (MFT), Copic 0.3 multiliner, White and Black Gel pens, Prismacolor pencils
Hi Everyone! 
Today I am sharing a watercolor card featuring the adorable Magical Unicorns stamp set and coordinating dies from Pink and Main stamps.


I started the card by making a soft watercolor background with some distress inks- Picked Raspberry, Wilted Violet, and Peacock Feathers. Then die cut the panel with the Stitched Rounded Rectangles Dies (largest one), next, I stamped the small hearts and stars from the set in the same distress inks. I stamped the unicorn and watercolored it with the same distress inks, I added some Scattered Straw to the horn. Then I die cut all the images using the coordinating Magical Unicorns dies and finished the card with some iridescent sequins and wink of stella glitter.


Thank you so much for stopping by!
Don't forget to join the current 
Have a wonderful day!

Kimberly


Hi Everyone! 
I hope you had a wonderful holiday 
and start to the New Year! 
Today I am sharing a project featuring 


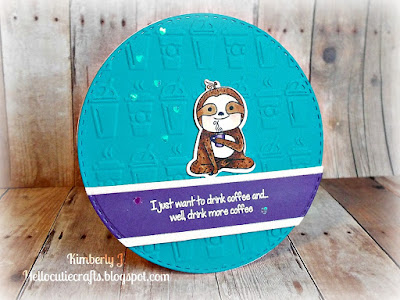
For my card base, I used the new Stitched Circle Dies for a fun circle card that measures about 4.75 in. so it will fit into an A2 envelope. I just adore this cute sloth from the Sloths stamp set, he's holding a cup of coffee, tea or cocoa, whatever you want it to be. I thought coffee and went with the coordinating sentiment from the set. I stamped and copic colored the sloth, then die cut him using the coordinating Sloth dies. Next, I heat embossed the sentiment in white on a purple card stock strip and layered that with some iridescent glitter washi tape. The background is embossed with a Tim Holtz coffee embossing folder then die cut with the same Stitched Circle Dies. I finished the card with a few heart sequins.


Thank you so much for stopping by today! 
A new challenge started this week on the 
Make sure to check it out and join the fun! 

Have a wonderful day!

Kimberly

Products used:
Ink- Copic markers, Versafine Onyx Black, Versamark, White embossing powder (SU)
Paper- Purple and teal Recollections card stock, SSS 110# white card stock
Other- Tim Holtz Coffee embossing folder, Scotch Glitter washi tape, Heart sequins from Studio Katia