Showing posts with label Pink and Main. Show all posts
Hi Everyone!!
Today I am sharing a project as a Guest Designer for Die Cuttin Divas.


I decided to make a box card using the Box Card Die from Pink & Main Stamps, some stamp sets and dies from My Favorite Things- the Magical Dragons, Make a Wish, and Beary Special Birthday stamp and coordinating dies.
My husband loves dragons and his birthday is this month so this challenge was just perfect. Besides, I don't know about you but I can always use Birthday cards. 


I started out with green cardstock from Bazzill for the card base, then I used the Dragon Tails 6x6 patterned paper from Doodlebug Designs to decorate the panels. Next, I stamped and copic colored the Dragons, presents and balloons then I was able to assemble the card. Finally, when I had everything in place for the box card, I added the sentiment from Make a Wish and framed it with some blue cardstock. 

I hope you like my card and are able to join the fun Die Cutting Divas Challenge.
Thanks for stopping by and have a wonderful day!!


Hi Everyone!
Today I am sharing a project for Pink and Main stamps and dies.

(This blog post contains affiliate links. Compensated affiliate links used when possible at no extra cost to you. I just receive a small portion of the sales through your purchase. So Thank You!!)

I'm sad to say that this will be my last post as a Pink and Main Design Team member. I started a new full time job in August as a Middle School classroom monitor and I just don't have the extra time right now but I have really enjoyed the privilege of being part of the team.


Now onto my card, I used the new Autumn Blessings stamp set along with the coordinating Autumn Blessings die and Pumpkin Spice 6x6 paper pad.
I started with a dark brown card base, I die cut a cream colored panel with the Stitched Rounded Squares die and stamped the cute boy and girl mice and sentiment "When I count my Blessings I count you twice" all in brown ink. Next, I copic colored the mice and paper pieced the apron and cuffs of the girl mouse. I also stamped, colored and die cut the pie from the set for them to hold. To the card base, I added a panel of patterned paper from the 6x6 pad and also some orange patterned paper that is die cut from the Scalloped Border die and added to the bottom of the first panel. Next, I stamped the "Happy Thanksgiving" sentiment in brown ink to another strip of orange patterned paper and added it to the bottom after I put some coordinating twine on it. I also added a hand cut flag banner to the top left of the card also decorated with some twine.


Thank you so much for stopping by!
Make sure to join the current
Pink and Main Challenge: Autumn.
I hope you have a wonderful day!! 

Other Supplies Used:
Paper- Chocolate Chip card stock (SU!), Cream card stock (Recollections)
Ink- Rich Cocoa ink (Memento), Copic markers, White gel pen
Other- Spiced Pumpkin Trendy Twine
Hi Everyone!
I hope you are having a wonderful week so far.
Happy First Day of Fall!! 
I am so ready for it this year.
Today, I am sharing a card inspired by the current My Favorite Things card sketch challenge #351.

For my card, I wanted to use two new products that I received recently. The cute Happy Hippos (MFT) and the Fairy Tales 6x6 paper (Doodlebug Designs).


I stamped and colored the two hippos with black ink, then colored them with copic markers. Next, I fussy cut them out. Then I used the Fairy Tales paper for the card layers. I used the Scallop Waves Die (Pink and Main stamps) and rounded the corners with a 1/2 in corner chomper (WRMK). Next, I stamped the sentiment in black ink and hand cut it out then layered it on some Orange cardstock (Bazzill) and foam mounted it. I die cut some balloons with the Birthday Balloons die (MFT) from some coordinating dotted patterned paper (The Paper Studio) and the strings from white card stock. Then, I added some white gel pen accents and finished the card off with some Lily White glitter sprinkles (Doodlebug Designs).


I was so excited to have a few moments to create a card and play along with the challenge.
Thank You so much for stopping by!
Have an amazing day!


Hi Everyone!
Today I am sharing a project for Pink and Main stamps and dies.

(This blog post contains affiliate links. Compensated affiliate links used when possible at no extra cost to you. I just receive a small portion of the sales through your purchase. So Thank You!!)


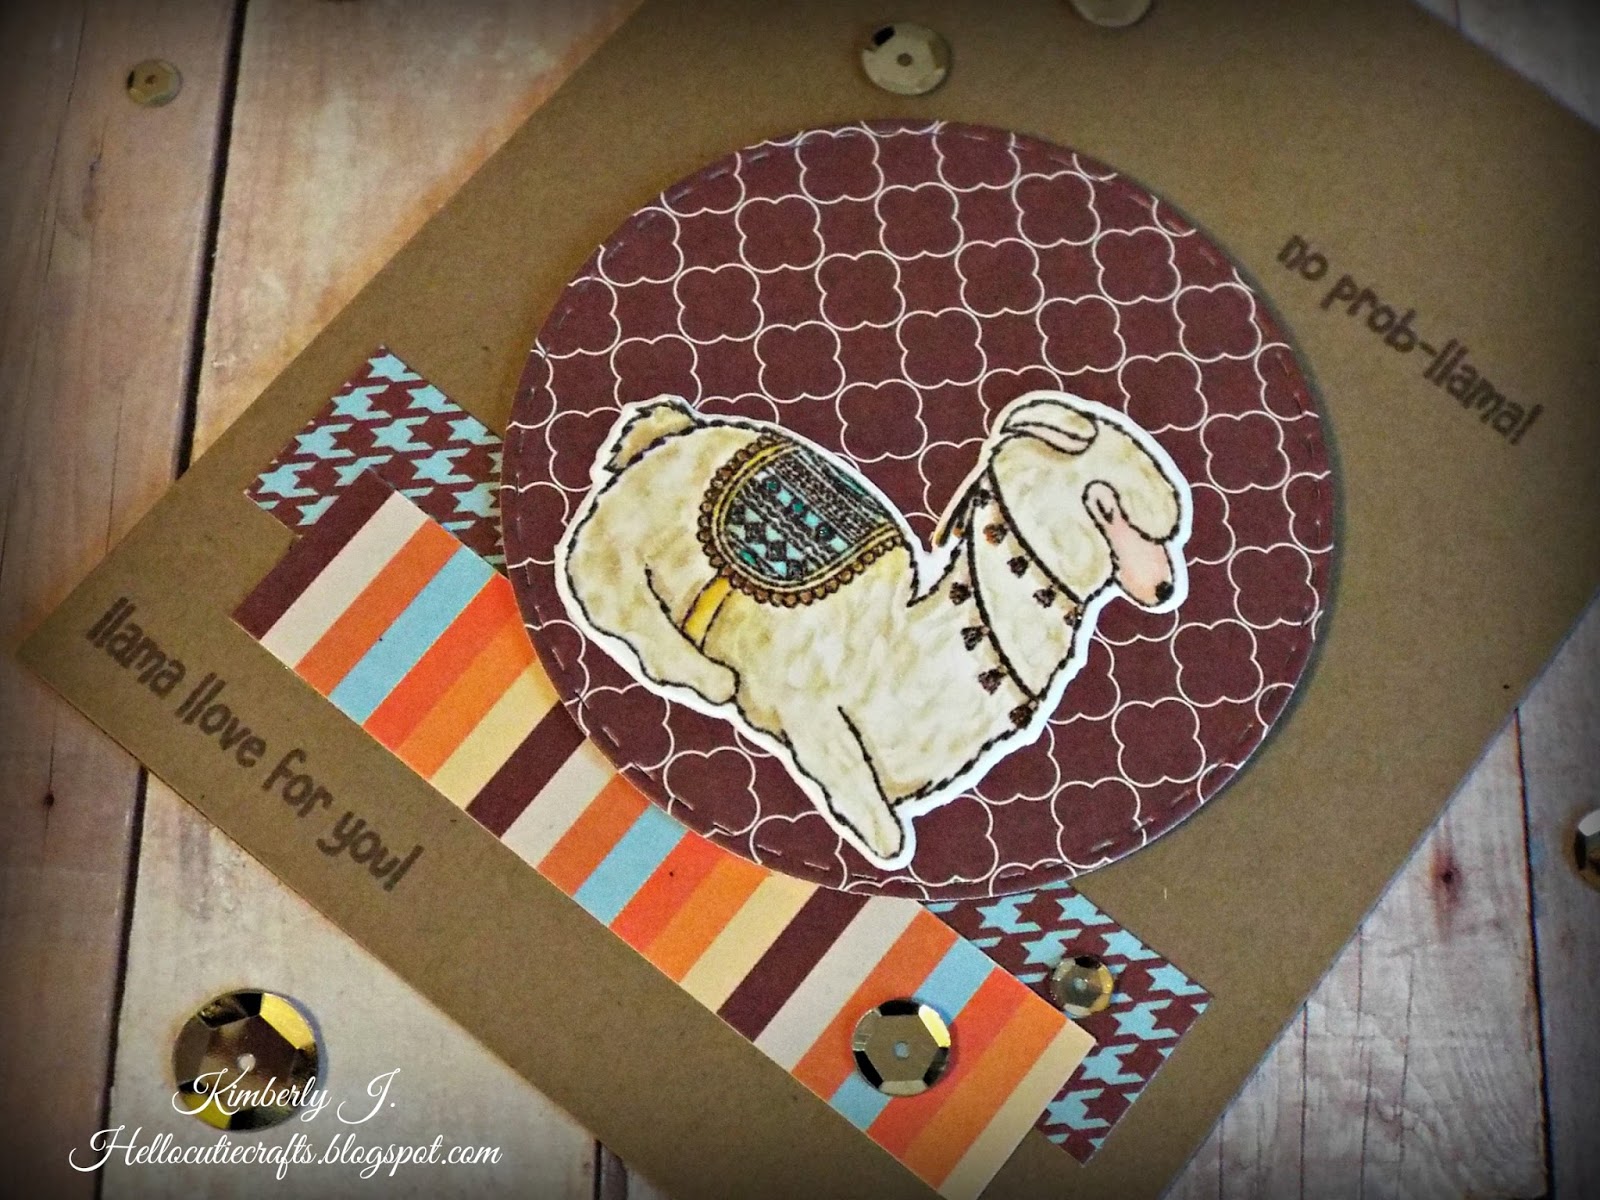
For the card today, I used the new Llamas stamp set and coordinating Llamas die paired with the  Pumpkin Spice 6x6 paper pad. I started with a standard A2 card base made from kraft card stock. Then I die cut a Stitched Circle die from some brown patterned paper from the 6x6 pad, along with two coordinating strips. Next, I stamped the resting Llama in rich cocoa ink then in versamark ink and heat set it with clear embossing powder and colored the Llama with distress inks. Finally, I die cut the Llama with the coordinating die. I added all the layers to the card front and then stamped the sentiments from the same set, they are just so punny!! I finished the card with some gold sequins.


Thank you so much for stopping by!
Make sure to join the current
Pink and Main Challenge: Autumn.
I hope you have a wonderful day!! 

Other Supplies Used:
Paper- Kraft card stock (The Paper studio), Tim Holtz Water color card stock
Ink- Rich Cocoa ink (Memento), Versamark ink, clear embossing powder, Distress inks
Other- Sequins
Hi Everyone!
Today I am sharing a project for
Pink and Main stamps and dies.

(This blog post contains affiliate links. Compensated affiliate links used when possible at no extra cost to you. I just receive a small portion of the sales through your purchase. So Thank You!!)


For the card today, I used the newly released Fall Bouquets stamp set and coordinating Fall Bouquets dies and Pumpkin Spice 6x6 paper pad. I started the card with a top folding A2 cream colored card base, then I picked two patterned papers from the 6x6 paper pad and the cream cardstock, layered them and die cut them out of the largest Stitched Rounded Rectangle die. Then I stamped the pretty flowers and bird from the Fall Bouquets stamp set in rich cocoa ink, then in versamark ink and heat embossed it with clear embossing powder, so that I could do some Distress ink watercoloring. When the image was dry, I die cut it with the coordinating die. Next, I stamped the "Thankful for you" sentiment with the rich cocoa ink on the layered panel. Then, I added some coordinating Trendy Twine to the panel and added fun foam to the back of the panel and adhered it to the card base. I finished the card with a few enamel dots.


Thank you so much for stopping by!
Make sure to join the current
Pink and Main Challenge: Autumn.
I hope you have a wonderful day!! 

Other Supplies Used:
Paper- Cream card stock 110# (Recollections), Tim Holtz water color card stock
Ink- Rich Cocoa ink (Memento), Distress inks (Ranger)
Other- Spiced Pumpkin Trendy Twine, Enamel dots
Hi Everyone!
Today I am sharing a project for Pink and Main stamps and dies.

(This blog post contains affiliate links. Compensated affiliate links used when possible at no extra cost to you. I just receive a small portion of the sales through your purchase. So Thank You!!)

I used the newly released this month, Sticky Note stamp set and the Sticky Note coordinating dies, paired with the Hugs Die and the Be Brave 6x6 paper pad.
The Be Brave papers have such a great masculine and western feel to them, I thought they went perfectly with the fun Cacti in the Sticky Note set. The sentiment is so fun! 


I started the card with a gray card base then added a panel of the chevron patterned paper from the paper pad. Next, I die cut a zig zag border out of navy card stock to layer and match the pattern paper. Then, I added a white panel and die cut the Hugs Die from white to layer on that panel for a tone on tone look. Next, I added the sentiment "Sorry I was Prickly" from the Sticky Note stamp set in black ink. Then I stamped and heat embossed the Cacti from the Sticky Note stamp set in black ink with clear embossing powder on watercolor cardstock and colored those in with Zig Clean Color brush markers. Finally, I die cut the cacti with the coordinating dies and added them to the card front.
I popped up every other cacti on the card front.


Thank you so much for stopping by!
Make sure to join the current
Pink and Main Challenge: School.
I hope you have a wonderful day!! 

Other Supplies Used:
Paper- Watercolor cardstock (Ranger), Navy and Gray card stock (Recollections), Solar White card stock (Neenah)
Ink- Zig Clean Color Brush pens, Onyx Black ink (Versafine) with clear embossing powder (Zing!)
Other- Stitched Border #1 die (Pretty Pink Posh) 

Hi Everyone!
Today I am sharing a project for Pink and Main stamps and dies.

(This blog post contains affiliate links. Compensated affiliate links used when possible at no extra cost to you. I just receive a small portion of the sales through your purchase. So Thank You!!)


I used the just released Happy For You stamp set, Happy For You coordinating dies with the Be Brave 6x6 paper pad and the Stitched Rounded Rectangle die. I started with a top folding A2 white card base, then die cut a white panel from the Stitched Rounded Rectangles die (the largest one) then die cut a few hearts from that panel and in laid a few die cut hearts from the Be Brave patterned papers. Next, I die cut the "Happy" from gray cardstock three times and layered them. I added the "We are" sentiment in black and the "For You" sentiment heat embossed in white. I added a few more hearts and some clear sequins to finish the panel and then popped it up on the card base.
The sentiments in the Happy For You are so fun and versatile for several occasions or just an everyday card to make someone smile.

Thank you so much for stopping by!
Make sure to join the current
Pink and Main Challenge: School.
I hope you have a wonderful day!! 

Other Supplies Used:
Paper- Solar White card stock (Neenah), Gray and Navy card stock (Recollections)
Ink- Onyx Black Versafine ink, Versamark ink with White embossing powder (Ranger)
Other- Heart dies (Amazon), Sparkling clear sequins (Pretty Pink Posh), Crystal Clear Sparkle Pen (Spectrum Noir)

Hi Everyone!
Today I am sharing a project for Pink and Main stamps and dies.

(This blog post contains affiliate links. Compensated affiliate links used when possible at no extra cost to you. I just receive a small portion of the sales through your purchase. So Thank You!!)

I used one of the new sets being released next week,
called Sticky Note.
The images and sentiments in this set are just so fun!
You will love them!


I stamped the cute cactus and sentiment in black ink on watercolor cardstock, then used a few Zig Clean Color brush markers to color in the cactus and added a little water wash to move the colors around. Next, I trimmed the panel down and added a strip of patterned paper from the Spring Color Pop 6x6 paper pad to the left edge and adhered this panel to the white card base. I finished the card off with a few enamel dots.


Thank you so much for stopping by!
Make sure to join the current
Pink and Main Challenge: School.
I hope you have a wonderful day!! 

Other Supplies Used:
Paper- Watercolor paper (Tim Holtz), Solar White card stock (Neenah)
Ink- Versafine Onyx Black ink
Other- Enamel Dots (Recollections)

Hi Everyone!
Today I am sharing a project for
Pink and Main stamps and dies.

(This blog post contains affiliate links. Compensated affiliate links used when possible at no extra cost to you. I just receive a small portion of the sales through your purchase. So Thank You!!)

I made a shaker card using the new Seas The Day stamp set and the coordinating Seas The Day dies.
I started the card out by stamping, and copic coloring the cute Octopus and Turtle from the set, along with the starfish and some coral and greenery.
Then I die cut the Octopus, Turtle and starfish. 
Next, I die cut several frames (about 10), made with the two largest Stitched Rounded Rectangles Dies, to create a window for the shaker. I also die cut two of the largest Stitched Rounded Rectangles for the background and the inside of the card. Next, I suspended the Octopus and Turtle inside the shaker frame using some clear thread, they can move around just a bit. I stamped the bubbles on the background using some coordinating ink. Then I added the background panel to a A2 card base, followed by the shaker frame with the suspended Octopus and Turtle. Next, I took some Heat Resistant Acetate and embossed the "Seas the Day" sentiment in white from the set. I added some sequins and seed beads to the shaker window before layering the acetate and two more frames on top of that.

The Octopus and Turtle move around the shaker card
just a bit, its a really fun card.

The sentiment is a little hard to see in pictures, so here is a close up of it. I hope you were inspired today!! Shaker cards are so much fun and the possibilities are endless!! 

Thank you so much for stopping by!
Make sure to join the current
Pink and Main Challenge: Red, White and Blue.
I hope you have a wonderful day!! 

Other Supplies Used:
Paper- Pool Party cardstock (SU), Solar White 80lb. cardstock (Neenah), Heat Resistant Acetate
Ink- Pool Party (SU), Versamark ink, White Embossing powder (Ranger), White gel pen (Sakura), Copic markers
Other- Sequins- 4mm Sparkling Clear (Pretty Pink Posh), Iridescent (Darice), Seed Beads, Clear Thread, Crystal Clear Sparkle Pen (Spectrum Noir)
Hi Everyone!
Today I am sharing a project for Pink and Main stamps and dies.

(This blog post contains affiliate links. Compensated affiliate links used when possible at no extra cost to you. I just receive a small portion of the sales through your purchase. So Thank You!!)

Summer time is definitely a time for several occasions, Graduations, Family Reunions, Weddings, Vacations, etc. So for my card today, I made a bridal shower card to help inspire for all the weddings coming up. I used the Congrats Die on this one.

First, I dry embossed the white glitter cardstock with the Next Level embossing folder in Heart, then layered the purple dotted paper and die cut the heart window. I also die cut the heart window out of a white top folding card base. Then, I added some sparkly white tulle to the heart window and surrounded that with score tape, to act as a window for the shaker elements. Next, I added some iridescent, silver, clear, and purple sequins mixed to the tulle window and sealed it. I added the panel to the card base. Then I added the "Congrats" that I die cut twice in Silver glitter and white across the heart window. Then I popped up the bra and panties that I cut out with the Cricut from the Forever Young cartridge in black and purple. Finally, I added some Sparkle pen and a rhinestone to the bra.


Close up of the sparkly tulle window on the card.


Thank you so much for stopping by!
Make sure to join the current
Pink and Main Challenge: Red, White and Blue.
I hope you have a wonderful day!! 

Other Supplies Used:
Paper- Silver Glitter cardstock (American Crafts), White glitter cardstock (Bazzill), Purple dots pattern paper (The Paper studio), 80# White cardstock (Neenah), Purple and black cardstock (Recollections)
Die- Classic Hearts die (Spellbinders), Forever Young cartridge (Cricut)
Other- White glitter tulle (Target), Crystal Clear sparkle pen (Spectrum Noir), Next Level Dotted embossing folder (WRMK), Sequins, Rhinestones

Hi Everyone!
Today I am sharing a project for Pink and Main stamps and dies for the July Challenge!
Make sure to visit the Pink and Main Challenge blog to be inspired and play along!!

(This blog post contains affiliate links. Compensated affiliate links used when possible at no extra cost to you. I just receive a small portion of the sales through your purchase. So Thank You!!)

For my card, I used a few newly released products The Scoop stamp set, The Scoop coordinating Dies, Beach Bum 6x6 paper pad, Hello Die and the Stitched Rounded Rectangles Die to create my Red, White and Blue card.

I started the card by stamping, coloring and die cutting the boy with the ice cream cone from The Scoop stamp set and die. Next, I die cut a rectangle window out of the white card front panel with the Stitched Rounded Rectangle die then  I added the sentiment "What's the Scoop?" to the bottom of the window in black ink. Then, I embossed the panel with a We Are Memory Keepers Next Level folder- Dotted. I popped up the panel on a white card base and added some of the navy patterned paper from the Beach Bum 6x6 paper pad to the window and added the cute boy on the top.
I die cut the Hello from white and red card stock for dimension and added it to the top of the card. Finally, I finished the card with some enamel dots after I added the boy to the window.


I always try to add a little something to the inside of the card and I added a strip of the patterned paper and a colored and die cut ice cream cone from the set.


Thank you so much for stopping by!
Make sure to join the current
Pink and Main Challenge: Red, White and Blue.
I hope you have a wonderful day!! 

Other Supplies Used:
Paper- Solar White card stock #80 and #110 (Neenah)
Ink- Copic Markers, Tuxedo Black Memento ink, Versafine Onyx Black ink, White Gel Pen (Sakura)
Other- We are Memory Keepers Next Level Dotted embossing Folder, Crystal Clear Sparkle pen (Spectrum Noir), Enamel Dots (Recollections)
Hi Everyone!
Today I am sharing a project for
Pink and Main stamps and dies.

(This blog post contains affiliate links. Compensated affiliate links used when possible at no extra cost to you. I just receive a small portion of the sales through your purchase. So Thank You!!)

For my cards today, I used the new Aloha Pineapple stamp set, Aloha Pineapple coordinating dies and the Shades of Spring 6x6 paper pad.

I used several colors of inks to stamp out two of the cute pineapples from the set and added a face to each one, then I die cut them with the coordinating dies. Then I stamped the heart in several colors to coordinate. Next, I stamped and white heat embossed the sentiments from the set. I added some burlap to kraft card bases then added the pineapples to the top of the burlap. Then I added the hearts and a few drops of coordinating Nuvo crystal and glitter drops. 


I used some of the orange chevron patterned paper from the Shades of Spring 6x6 paper pad for the sentiment on this card.


Thank you so much for stopping by!
Make sure to join the current
Pink and Main Challenge: Summer.
I hope you have a wonderful day!! 

Other Supplies Used:
Paper- Solar White cardstock (Neenah), Kraft card stock (Recollections), Burlap (DCWV), Bubblegum pink card stock (SSS)
Ink- Versamark, Versafine Onyx Black ink, Melon Mambo (SU), Summer Sun (SU), More Mustard (SU), Pink Passion (SU), Pixie Pink (SU), Green Galore (SU), White Embossing Powder (Ranger)
Other- Nuvo Drop Crystal- Morning Dew and Carribean Ocean, Glitter- White Blizzard
(This blog post contains affiliate links. Compensated affiliate links used when possible at no extra cost to you. I just receive a small portion of the sales through your purchase. So Thank You!!)


Hi Everyone!! All this week, the Pink and Main designers have teamed up with the Xyron Designers to have a creative Blog Hop using Pink and Main Stamps/Dies/Papers and Xyron Adhesives
Make sure to visit the Pink and Main blog all this week for a sneak peek at all the projects.
Also, please visit the Xyron Facebook page to see their team's crafty inspiration. 
Don't forget to comment on the  blog posts for a chance to win a $25 Gift Certificate from Pink and Main stamps and also a Xyron Prize pack!! Make sure to comment in order to win, the more comments,
the more chances at winning! 

For my project, I made a fun 2x2 Mini Album using several products from this month's Pink and Main release, along with the Xyron Create a Sticker Max, 1.5in. Sticker Maker and the Wedge Shaped Permanent Glue stick.


I started the mini album by using a Lori Whitlock svg, a 2x2 accordion mini album, that I cut with the Cricut Explore Air 2 out of the Beach Babe 6x6 paper pad and a few other coordinating card stocks. Then I ran those pieces to adhere them through the Create a Sticker Max and built my album, the few pieces that only needed a little bit of adhesive, I used the Wedge shaped glue stick and built the album.


Next, I went on to decorate the cover. I stamped, colored and die cut the images from the Sending Waves stamp set and the Sending Waves Dies. I stamped and die cut the sentiment in white and used the Stitched Rounded Rectangles die (Smallest One).


The pages all together in the accordion album. 
The pages are simply decorated to leave plenty of room for journaling, pictures, stickers, etc. I used the Stitched Rounded Square Die to create some journaling spots from some lined project life cards. The album has about 5 of these spots.


I also used The Scoop stamp set and The Scoop Coordinating Dies. I also used the Stitched Rounded Rectangles die for the sentiment from the set. How cute are these images?!? The Create a Sticker Max was perfect to add all these images to the album.


For the back of the album, I added a Stitched Rounded Rectangle Die in white to add the name and date.

Front and back covers.
This little album came out so cute and I think it will be perfect for our kids to record their summer memories in! 

Don't forget to visit the Pink and Main Blog and the Xyron Facebook page to see more inspiration all week!  Have a wonderful day!! 

Other Supplies Used:
Ink- Tuxedo Black Memento ink, Copic Markers, Versafine Onyx black ink, Versamark ink, White embossing powder (Ranger), Stampin pastels (SU), White gel pen (Sakura)
Paper- Solar white cardstock (Neenah), Bubble gum pink cardstock (SSS), Teal Shimmer cardstock (Bazzill)
Other- Crystal Sparkle pen (Spectrum Noir)